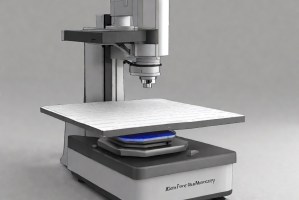
Microhardness Testing Services – Vickers, Knoop & Case Depth
The hardness of small samples, complicated forms, and surface coatings can be determined via microhardness testing. Vickers and Knoop's tests are available with applied loads ranging from 25 g to 1 kg. Results are certified and documented with conversion charts for comparison. The test process involves pressing a diamond indenter with a penetrator and light load and then measuring the indentation under a microscope. By combining the indentation with the test load, hardness values are calculated.

TRUSTED BY


- Overview
- Scope, Applications, and Benefits
- Test Process
- Specifications
- Instrumentation
- Results and Deliverables
Microhardness Testing – Overview
Microhardness testing is a critical technique for measuring material strength at a localized scale by evaluating resistance to indentation under very low applied loads. It is widely used to assess thin coatings, microstructural phases, and surface-treated layers where conventional hardness methods cannot provide accurate results.
By analyzing indentation geometry produced by diamond indenters such as Vickers or Knoop, the test provides precise hardness values linked to material strength and deformation behavior. It enables detailed mapping of hardness variations across microstructures, helping engineers understand gradients, detect weak zones, and correlate hardness with mechanical performance.

Scope, Applications, and Benefits
Scope
Microhardness testing focuses on evaluating localized material strength and hardness at micro-scale levels, enabling detailed analysis of surface properties and microstructural variations under controlled indentation conditions.
- Measurement of hardness in thin films and coatings
- Evaluation of microstructural phases and localized regions
- Assessment of heat-treated and surface-hardened materials
- Determination of hardness gradients across depth
- Comparative analysis of small or precision components
Applications
- Coating and thin film hardness evaluation
- Case depth and surface hardening analysis
- Microstructural characterization of alloys
- Failure analysis of localized defects
- Quality control in precision manufacturing
- Research and development of advanced materials
Benefits
- Enables precise measurement of localized strength properties
- Suitable for very small or thin material sections
- Minimal damage due to low indentation loads
- Supports detection of micro-level inconsistencies
- Helps correlate hardness with mechanical performance
- Improves reliability and quality of materials
Microhardness Testing – Test Process
Sample Preparation
The specimen surface is meticulously polished to achieve a flat, mirror-like, defect-free finish.
1Indentation Application
A precisely controlled load is applied using a calibrated diamond indenter for a defined dwell duration.
2Indent Measurement
The indentation diagonals or length are accurately measured using a high-magnification optical microscope system.
3Hardness Calculation
Hardness values are computed using standardized formulas based on applied load and measured indentation geometry.
4Microhardness Testing – Technical Specification
| Parameter | Details |
|---|---|
| Indenter Type | Diamond pyramid (Vickers) or elongated diamond (Knoop) |
| Load Range | Typically 10 gf to 1000 gf depending on material and layer thickness |
| Dwell Time | Standardized duration of 10 to 15 seconds for consistent deformation |
| Measurement Method | Optical measurement of indentation diagonals or major axis |
| Resolution | Capable of resolving indentation dimensions in micrometer scale |
| Sample Thickness | Suitable for thin coatings, layers, and small cross-sections |
| Measurement Units | HV (Vickers Hardness), HK (Knoop Hardness) |
Instrumentation Used for Testing
- Microhardness tester (Vickers/Knoop)
- Optical microscope with measurement software
- Diamond indenter assembly
- Precision polishing machine
- Sample mounting press
- Calibration reference blocks
Results and Deliverables
- Microhardness values (HV or HK)
- Indentation images with dimensional analysis
- Hardness distribution profile across depth or surface
- Coating or case depth evaluation results
- Standard-compliant test report
- Interpretation with material performance insights
Frequently Asked Questions
Microhardness values correlate with yield strength and resistance to plastic deformation at localized regions. While not a direct tensile measurement, it provides strong comparative insight into material strength, especially for thin layers and microstructural features.
Conventional hardness tests penetrate too deeply, affecting substrate influence. Microhardness uses low loads, ensuring indentation remains within the coating, providing accurate representation of surface strength without interference from underlying material.
By performing multiple indentations across a surface or cross-section, hardness variations can be mapped. Lower hardness regions often indicate weaker zones, defects, or inconsistent processing, which may lead to failure under service conditions.
Higher microhardness generally indicates better resistance to surface wear and abrasion. However, excessive hardness may reduce toughness, so an optimal balance is required depending on application requirements.
It allows precise evaluation of localized properties in complex materials, supporting design, quality control, and performance optimization where traditional bulk testing methods are insufficient.
Why Choose Infinita Lab
for Electron Energy Loss
Spectroscopy (EELS)?
At the core of this breadth is our network of 2,000+ accredited labs in the USA, offering access to over 10,000 test types. From advanced metrology (SEM, TEM, RBS, XPS) to mechanical, dielectric, environmental, and standardized ASTM/ISO testing, we give clients unmatched flexibility, specialization, and scale. You are not limited by geography, facility, or methodology – Infinita connects you to the right testing, every time.
Looking for a trusted partner for Electron Energy Loss Spectroscopy (EELS) Testing?
Send query us at hello@infinitlab.com or call us at (888) 878-3090 to learn more about our services and how we can support you.

Request a Quote
Submit your material details and receive testing procedures, pricing, and turnaround time within 24 hours.
 Quick Turnaround and Hasslefree process

 Confidentiality Guarantee

 Free, No-obligation Consultation

 100% Customer Satisfaction


